Pages

Friday, June 29, 2012

Quinoa Crust Pizza

I enjoy making various types of pizza crusts, rather than just buying premade ones.  It's hard to find gluten free ones that are also vegan anyways.  The other day I came across this one that was made out of quinoa.  Since I love quinoa, I thought this crust would be a great alternative to the regular pizza crust.  I cannot remember where I saw the original recipe, but as soon as I do I'll link it on here. 

Here is how I made my crust:

Ingredients:
  •  3/4 cup quinoa
  • 1 1/2 cup vegetable broth
  • 1 garlic clove, chopped
  • 1/2 tsp salt
  • 1 flax egg
Directions:
  1. Cook the quinoa in the vegetable broth until it absorbs the liquid (about 15minutes).  Allow to cool slightly.
  2. Combine the cooked quinoa with garlic and salt in a food processor.  Blend until it starts to stick together.  Transfer to a bowl and stir in the flax egg.
  3. Pour the mixture into a greased pan.  Squish the dough down so it is thin and sticks together.
  4. Preheat oven to 400F.  Cook for 10 minutes.
  5. Turn the oven down to 350F and continue to cook 15-20 more minutes.
  6. Take out the crust, put on sauce, cheese, and any additional toppings.  Cook for another 5-8 minutes.
  7. Allow to cool before cutting and serving.

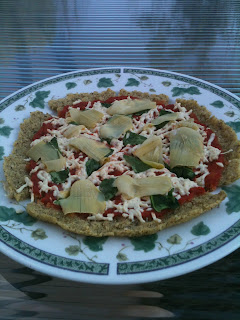
This crust was tasty, but it didn't hold together that well for pizza.  I had to eat this with a fork since it was so soft, and not crispy at all (except the crust).  Even though this was a "pizza", I felt like I was eating my typical meal of mixing veggies with some quinoa and pasta sauce only without adding beans but adding cheese and baking it.  So even though this was good, it was more of like a baked quinoa dish.

I added spinach leaves and artichoke hearts to my pizza!

Thursday, June 28, 2012

Almond Banana Chocolate Chip Muffins

I have been wanting to make a muffin with banana and peanut butter for a while, I love those two together.  I came across this recipe on pinterest, and realized I could easily veganize it and it was already gluten free!  Even though the recipe calls for almond butter, I was going to use peanut butter, since like I said I love that combination.  But then I started reading about almond butter and found that it has a lot of healthy nutrients and obviously almonds are a much heart healthier nut than peanuts.  I wanted to try almond butter anyways so bought some and that stuff is incredible! 


This recipe was adapted from here.

Ingredients:
  • 3/4 cup almond butter
  • 1 cup almond flour
  • 3 medium ripe bananas, mashed
  • 2 flax eggs
  • 1 tsp baking powder
  • 1 tsp baking soda
  • 1/2 tsp cinnamon
  • 1/3 cup chocolate chips (I used mini-chocolate chips by Enjoy Life)
Directions:
  1. Preheat oven to 350F and line muffin tin with cupcake liners.
  2. In a mixing bowl, combine all ingredients except chocolate chips.  Mix everything together.
  3. Stir chocolate chips into batter.  Pour batter into prepared muffin tin.
  4. Top muffins with a few additional chocolate chips.
  5. Bake for 20-25 minutes, or until golden.

 Even though these muffins would be good with peanut butter, I really enjoyed the almond butter!  Maybe next time I'll try with peanut butter though.

These muffins are great for breakfast, as a snack, or as a special treat after dinner!

Wednesday, June 27, 2012

Orange Ginger Tofu

I had some tofu in the freezer (great way to keep it from going bad and gives it a great texture after baking) and I decided to bake it last night for dinner when I came across this recipe that had a different kind of marinade than the usual soy sauce one.  The original recipe calls for mango chutney or mango jam, but I didn't have either of these or the another ingredient, apple cider vinegar.  However, I did have apricot jam so I used that and decided to substitute orange juice for the apple cider vinegar as a choice from the original recipe.  That's how I turned this into Orange Ginger Tofu! (I also doubled the marinade mixture.)

This recipe is adapted from here.

Ingredients:
  • 1 block extra-firm tofu (recommended freezing first)
  • 1/2 cup no sugar added apricot jam
  • 1/2 cup maple syrup
  • 4 tablespoons orange juice
  • 2 tsp ground ginger
Directions:
  1. Slice tofu into blocks.
  2. Mix together all other ingredients to create the marinade.
  3. Marinate tofu for at least 15 minutes or overnight. (I marinated mine overnight and it gave an amazing flavor.)
  4. Place tofu onto a greased baking sheet.
  5. Bake at 450F for 15-18 minutes.
  6. Flip tofu over and continue to bake for 3-8 minutes.
I baked these for both the longer amounts, and then left the tofu in the oven for about 5 minutes after I turned the oven off.  The tofu came out very well done.  If you don't like soft tofu, I recommend baking it for the longer amounts.  (And maybe even a little extra, depending on your preference.  Just make sure it doesn't burn!)  My family loved the texture of the tofu and said it was their favorite I've ever made.


As I bit into the tofu, I could taste the juices flowing out; it was heaven!  These are great alone, or I chopped them into smaller pieces and threw them in a salad.

Tuesday, June 26, 2012

Chocolate Chip Protein Cookies

I was in the mood for some cookies today and wanted to try these protein cookies; they seemed like a great way to get my protein for the day!  They are very similar to these Peanut Butter Chocolate Chip Cookies except they don't use peanut butter but protein powder as the main protein source.


I made a few changes to the original recipe, which is adapted from here.

Ingredients:
  • 1 can chickpeas, rinsed
  • 3 tablespoons water
  • 1/3 cup protein powder (I used brown rice protein)
  • 1/4 cup agave (can be omitted)
  • 1 teaspoon vanilla extract (can be omitted)
  • 3/4 cup chocolate chips
Directions:
  1. Preheat oven to 350F.
  2. In a food processor, blend chickpeas.  Add water, protein powder, agave and vanilla (if using) and blend until dough forms.
  3. Stir in the chocolate chips with a wooden spoon.
  4. Form into 1-inch balls and place on cookie sheet.  Bake for 15 minutes.
These were super tasty and easy to make, and since their made with chickpeas and have SO much protein powder, these are definitely a no guilt cookie!  I will be making these again sometime very soon.


Monday, June 25, 2012

"Crab" Cakes

Great Sage is my favorite restaurant and one of their current seasonal dinner meals right now is this Hearts of Palm "Crab Cake".  Even before I was vegan I never liked crab.  But since this one wasn't even really crab (and being from Maryland) I was definitely tempted to try this "crab" cake.  Unfortunately I haven't had a chance to try this meal yet. (The last time I went the Indian Red Lentil Curry sounded really good so I went with that choice.)

Well, shortly after I was at Great Sage, a blogger I follow reviewed this particular meal when she had it at Great Sage.  She then recreated the meal at home!  They have the same ingredients as the "crab" cakes from Great Sage.  I immediately knew I'd be making these "Crab" Cakes for myself!


This recipe is adapted from here:

Ingredients:
  • 1 15 oz can Hearts of Palm, drained
  • 1 flax egg
  • 1/2 cup breadcrumbs*
  • 1 T old bay
  • 1 T veganaise
  • 1 tsp dill
  • 1 tsp dried parsley
  • 1 tsp yellow mustard
Directions:
  1. Preheat oven to 400F and coat a glass baking dish with non-stick spray.
  2. Mash the hearts of palm in a bowl (or gently pulse in a food processor.)
  3. Add the rest of the ingredients and stir together.
  4. Divid the mixture into 4 equal parts and shape them into balls, then gently flatten them.
  5. Bake for 25-30 minutes, or until golden brown. Flip them halfway through baking time.

* Note: I had the hardest time finding breadcrumbs.  All the gluten free brands had egg whites or milk listed in the ingredients so I decided to make my own breadcrumbs out of crackers by putting them in a gallon-sized ziploc bag and using a roll pin to crush them.  I used Multi-Seed Gluten Free Rice Thin Crackers by back to Nature.  These were gluten free AND vegan!


I also made the remoulade mentioned on the blog to top as a sauce for these "crab" cakes:

Ingredients:
  • 1/4 cup roasted red peppers
  • 1/4 cup roasted red onion
  • 2 T yogurt (I used Silk)
  • 1 T veganaise
  • 1 tsp lemon juice
  • 1 tsp dill
Directions: Combine all ingredients in a food processor and mix until smooth.


This meal was very simple to make and to clean up afterwards.  It was also very tasty.  I will definitely be making this again.  I might even double the recipe next time!


Sunday, June 24, 2012

Sweet Potato Bisquits

These bisquits make a great side or even a snack and were super easy to make.  I ate one warm right after it came out of the oven and it was good.  I also tried one warm with Earth Balance and that was also good.  But I actually enjoyed these best the next day at room temperature even without Earth Balance.


This recipe is adapted from here.

Ingredients:
  • 1 cup of mashed, cooked sweet potato (I used 2 small/med sized)
  • 1 cup Bisquick (I used gluten free)
  • 3 tablespoons vegetable oil
  • 1 tablespoon maple syrup
  • 1 tsp cider vinegar 
  • 1 tsp nutmeg
Directions:
  1. Cook the sweet potato until soft and mash it in a bowl.
  2. Preheat oven to 400F.
  3. Add all other ingredients to the mashed sweet potato and mix together until a dough forms.
  4. Drop spoonfuls of the dough onto an ungreased baking sheet. (I rolled them into balls then gently pressed on the tops)
  5. Bake 12-15 minutes or until the tops are golden.


Saturday, June 23, 2012

Blueberry Syrup

I usually prefer to make my own pancakes, especially with all the different add-ins you can include to make traditional pancakes in a variety of ways with so much flavor.  But I had one store bought blueberry waffle left that I thought would make a good breakfast one morning, plus I had some fresh blueberries from the Farmer's Market that needed to be used.  Instead of just adding some fresh blueberries to a blueberry waffle (the store bought kind does not have near enough blueberries for me) I had a great idea to make some blueberry syrup!


I adapted this recipe from The Whole Life Nutrition Kitchen which had a great and easy recipe with no unnecessary added sugar.  I cut this recipe in half since I was only making the syrup for one waffle and I still have extra stored in the fridge.  Here's the recipe I used:

Ingredients:
  • 1/2 cup fresh or frozen blueberries
  • 1/2 cup water
  • 1 tablespoon maple syrup
  • 1 tablespoon arrowroot powder
Directions:
  1. Place all ingredients in blender and blend until smooth.
  2. Pour the mixture into a small saucepan and heat over medium heat until bubbles begin to form.
  3. Slightly reduce the heat and continue to cook while whisking the entire time until the syrup becomes thick, about 3-5 minutes.

This syrup tastes so fresh and would be great over waffles or pancakes, or even maybe a great topping for a muffin, cupcake, or ice cream!


Friday, June 22, 2012

Black Beans and Rice with Pineapple

For dinner last night, I felt like I needed a good source of protein after a workout so decided to make black beans and rice.  This is a pretty typical meal for me so I wanted to add something in to make it a little different.  Looking in the fridge, I found some pineapple that needed to get used up and thought the combination of black beans and pinepple would give an interesting flavor and be perfect for this hot summer weather.  The sweet pineapple definitely gave this meal a delicious kick.

I usually don't post recipes unless I have exact directions to follow, but I thought that this was such a creative meal and could and should be added as a great entree on my blog.  Since I was only cooking for myself, I just kind of estimated the amounts of everything until I had as much as I wanted for my meal, but here is a rough recipe:

Ingredients:
  • black beans
  • brown rice
  • pineapple (diced)
  • pineapple juice
  • seasonings (if desired)
Directions:
  1. In a pan, saute the black beans and brown rice in pineapple juice over medium high heat.
  2. Once the pineapple juice is almost evaporated, add in the diced pineapple (you want it warm but not too soft).
  3. Continue to heat until the pineapple juice is completely evaporated.  Add any seasonings if you want additional flavor. (I added some nutritional yeast).

I really enjoyed this last minute meal and will definitely be making it again.

Thursday, June 21, 2012

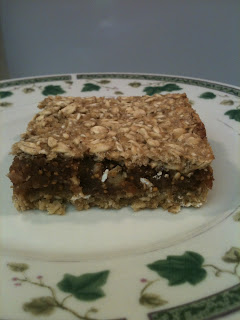
Fig Newton Bars

Fig Newtons probably used to be one of my favorite snack foods.  Since they contain wheat and milk I obviously no longer eat them and really miss them.  I could always buy those expensive gluten free and vegan Fig Newtons, but they are not the healthiest snack option.  After researching online I came across a much healthier, tastier, less expensive option that's fun to make!


This recipe was adapted from FatFree Vegan Kitchen:

Ingredients:
Filling:
  • 8 ounce package dried figs
  • 1/2 cup pitted dates
  • 2 tablespoons almonds (optional)
  • 1 tablespoon agave
  • 2 tablespoons water
  • 1 tablespoon lemon juice
  • 1/4 tsp cinnamon
  • 1/8 tsp ginger
Crust:
  • 1 cup GF oats, ground in blender until fine
  • 1 cup GF oats, unground
  • 1 teaspoon baking powder
  • 1/4 teaspoon salt
  • 1/2 cup unsweetened applesauce
  • 3 tablespoons agave
  • 1/4 cup water
Directions:
  1. Preheat oven to 375.
  2. Blend dried figs, dates, and almonds in a food processor until a paste forms.
  3. Add agave, water, lemon juice, cinnamon, and ginger to the mixture and process until mixed.  Set this mixture aside.
  4. Combine both the ground and unground oats, baking powder, and salt.
  5. Add in the applesauce, agave, and water and mix until thick.
  6. Press half the crust mixture into a greased 8x8" pan.
  7. Spread the fig mixture evenly over the crust carefully with your hands.
  8. Smooth the remaining crust mixture over the filling.
  9. Bake for about 30 minutes, or until lightly browned on top.
  10. Cool completely before cutting into bars.

Since this was my first time making these Fig Newton Bars, I followed the recipe exactly as written.  Next time, I think I'm going to try making them without the almonds, though I did love the flavor it added.

Sunday, June 17, 2012

Protein Pancakes

I have been hearing a lot about protein pancakes and they sounded like such a healthy and nutritious way to start this beautiful Sunday morning.  I adapted this recipe from here.


Ingredients:
  • 2 tablespoons Bob's Red Mill Gluten Free Pancake Mix
  • 1 tablespoon brown rice protein powder
  • 3/4 tsp baking powder
  • 1/2 tsp cinnamon
  • nutmeg
  • sea salt
  • 1 flax egg
  • 1/4 cup almond milk
  • 1/2 tsp vanilla
Directions:
  1. In a medium bowl, combine pancake mix, protein powder, baking powder, cinnamon, nutmeg, and sea salt. 
  2. Add in wet ingredients (flax egg, almond milk, and vanilla).
  3. Whisk together until batter is smooth.
  4. Cook over medium heat.
This makes 3 small pancakes or 2 medium sized pancakes.  Of course you can always double or triple the ingredients to make more!

Friday, June 15, 2012

Mediterranean Pasta

I haven't had pasta in a while and decided to have some for dinner tonight, but I wanted to try something different than just regular spaghetti.  Well I was craving artichoke hearts and just picked up a can at the grocery store today and thought it would be perfect in pasta.  I googled some pasta dish ideas with artichoke hearts and found one that I modified for the ingredients I had on hand.

This recipe was inspired from Whole Living:

Ingredients:
  • 8 ounces brown rice spaghetti
  • 1 can artichoke hearts - drained, rinsed, and quartered
  • 1/3 cup black pitted olives, quartered
  • 3 teaspoons minced garlic
  • 1/4 - 1/2 cup white cooking wine
  • salt and pepper to taste
  • pasta sauce, if desired
  • nutritional yeast (optional)
Directions:
  1. Cook spaghetti according to directions on package.
  2. Meanwhile, saute the artichoke hearts and black olives in the white cooking wine.
  3. Add the minced garlic, salt, and pepper.
  4. Continue to heat until the white cooking wine evaporates.
  5. Once the spaghetti is cooked and drained, mix the artichokes and olives into the spaghetti.
  6. Serve immediately, or add pasta sauce first.  If you want, you can also sprinkle on some nutritional yeast.

Notes:
  • I used less spaghetti than the original recipe but still added the whole can of artichoke hearts and even added extra black olives. (I like lots of add-ins mixed into my spaghetti.)
  • I also added a little pasta sauce to mine (probably about 1/2 a jar) because the sauce I had in the cabinet was tomato and basil and those were 2 ingredients I did not add to my recipe that was called for in the original recipe.
  • I then topped my pasta off with some nutritional yeast which gave this meal a great extra flavor.

I really enjoyed this meal and am so glad I have leftovers for lunch or dinner tomorrow :)

Wednesday, June 13, 2012

Peanut Butter Chocolate Chip Cookies

I found these Peanut Butter Chocolate Chip Cookies through pinterest.  They seem very similar to this cookie dough I've made before (I haven't put up the recipe on my blog yet) but this recipe bakes the "dough" into actual cookies.  When I made these, I cut the recipe in half (I didn't need ALL those cookies around).  By halfing the recipe I made 13 cookies (I think mine were smaller than the cookies made in the original recipe.) 

Here's the recipe to make the full batch of cookies which was inspired from here:

Ingredients:
  • 1 and 1/4 cup chickpeas, drained and rinsed
  • 2 teaspoons vanilla extract
  • 1/2 cup + 2 tablespoons natural peanut butter
  • 1/4 cup agave
  • 1 teaspoon baking powder
  • 1/2 cup chocolate chips
Directions:
  1. Preheat oven to 350.
  2. Combine all ingredients, except chocolate chips, in a food processor and blend until smooth, scraping down the sides as needed.
  3. Stir in chocolate chips.
  4. Wet hands and form the dough into balls. The dough will be VERY sticky.
  5. Place each ball on parchment paper.
  6. Bake for 10 minutes

Note: Even if the cookies do not look completely done after 10 minutes,they will continue to bake slightly after taking them out of the oven as they are cooling.


These cookies are also very similar to these Chocolate Chip Protein Cookies.


Based on one cookie (depending on size of your ball):
Approximately 60 calories and 3g protein.

Tuesday, June 12, 2012

Peanut Butter Cups

After I made these Banana Split Bites, I had some extra melted chocolate.  Since I am a chocolate lover there was no way I was about to waste that delicious chocolate.  I had two options: eat the chocolate straight from the bowl or make a mini peanut butter cup.  I already had the mini cupcake liners out so I decided on the latter option.

To make these peanut butter cups, all you have to do is use leftover melted chocolate or just melt a tablespoon of vegan chocolate chips (to make one) in the mircowave (or you can always melt more chocolate to make more peanut butter cups).  Spoon a little bit of chocolate in a mini cupcake liner and freeze for about 15 minutes.  Scoop some peanut butter on top of the frozen chocolate (the amount is up to you on how peanut buttery you want your Peanut Butter Cup).  Finally, top that with the rest of the melted chocolate.  Freeze for another 15 minutes or longer if you want to eat it later.  If you keep it in the freezer for a few hours make sure to thaw for at least 10 minutes before enjoying!


To make these look even more like the real thing you can even spread the chocolate not only on the bottom of the mini cupcake liner but also around the sides so that the peanut butter is just in the middle once you spoon the rest of the melted chocolate on top!

Sunday, June 10, 2012

Banana Split Bites

Last night I went to this small get-together party.  I wanted to bring a fruity treat that was sweet.  I decided this small party would be a great opportunity to try out these Banana Split Bites. 


I adapted this recipe from Oh She Glows. I actually used a little bit more bananas and strawberries in order to make more for my party.  Here's what I did to make these perfect bite-sized treats:

Ingredients:
  • 3 bananas (I cut them into about 12 pieces each)
  • strawberries (I didn't count out an exact amount)
  • 6 tbsp chocolate chips
  • 1 tbsp coconut oil
  • shredded coconut (once again I did not measure this)
Directions:
  1. Place mini cupcake liners on a small baking sheet.
  2. Slice bananas and place 1 piece onto each mini cupcake liner.
  3. Slice the strawberries (make these smaller than the banana pieces) and place 1 piece onto each mini cupcake liner with the banana.
  4. Melt chocolate chips with the coconut oil on the stove or in the microwave in 30 second intervals.
  5. Drizzle about 1/2 teaspoon of melted chocolate onto a treat and immediately sprinkle shredded coconut on top. (Continue this process until all treats have chocolate and coconut on top.)
  6. Freeze for a minimum of 15 minutes.  If they are in the freezer for a long time, let them sit on the counter for about 15 minutes to soften up a bit. 


I made 40 treats with these ingredients.  Obviously, you can use more or less bananas and strawberries to make however many bites you want.  You can also make bigger bite-sized treats or smaller bite-sized treats.  This recipe is very adaptable.

If you don't eat these right away, or there are leftovers, store in a Tupperware container in the freezer and thaw 15 minutes before eating.
When I brought these to the party, they had started to defrost and get liquidy in the mini cupcake liner after about 2 hours of being out.  I recommend only taking these out of the freezer 15 minutes prior to serving.  When people are done eating, put them back in the freezer and take them out again later if anyone wants some more so they don't melt.


Tuesday, June 5, 2012

Chocolate Tofu Pie

It's my birthday!!!  So of course I made my favorite chocolate pie! 


I recommend using a graham cracker crust for this pie, either homemade or store-bought.  For a vegan, gluten free pie crust try this recipe.


Ingredients:
Directions:
  1. In a blender, blend the silken tofu until creamy. 
  2. Melt the chocolate chips in a microwave in 30 second increments.
  3. Add the melted chocolate chips and vanilla extract into the blender with the tofu and blend until well mixed and smooth, scraping down the sides with a spatula as needed.
  4. Pour into a pie pan.  Place in fridge for at least 2 hours before eating to allow it to firm up.  The longer the pie sits in the fridge, the thicker and richer the pie gets!


The best thing about this pie is it is so simple and who doesn't love a delicious chocolate pie that is super easy to make.  It means there is time to make it again and again!


Monday, June 4, 2012

Quinoa Peach Pudding

About two months ago I was at my favorite restaurant, Great Sage, with a group of people from the cat shelter where I help volunteer.  For dessert, one person ordered Quinoa Pudding.  It was served in this small shot glass; it was called "Just A Taste" and it looked so good!  I absolutely love quinoa and thought this was an amazing idea.  I went home and immediately googled recipes to get some ideas of how I could make this at home.  After making my version, I definitely want to go back to Great Sage to compare how their version tasted.


This recipe was inspired from Great Sage's Quinoa Pudding:

Ingredients:
  • 2 cups cooked quinoa
  • 2 cups almond milk
  • 2 peaches (washed, peeled, and chopped)
  • 1/2 cup maple syrup
  • 2 teaspoons lemon juice
  • 1 teaspoon cinnamon
  • 1 teaspoon vanilla extract
Directions:
  1. Place all ingredients in a saucepan.
  2. Bring to a boil over medium high heat, then reduce to simmer on low for about 20 minutes, or until creamy. Adjust flavor and consistency if needed. (Mine actually took a while, and I added a little extra quinoa.)
  3. Spoon into 4 parfait classes and serve warm or chilled. (I served mine chilled, it gets thicker the longer its cooled in the fridge.)
This made 4 huge servings! You can add more peaches if you want more of a fruity flavor or try a different fruit!

Here is the pudding just about to start boiling in the saucepan.


I loved how easy this was to make and how much protein you get from the quinoa!  Next time I think I'll try strawberries!

Sunday, June 3, 2012

Lemon Basil Pasta

Last week for Memorial Day I wanted to make a dinner for my family that was light and somewhat resembled something you might bring as a side dish at a Memorial Day picnic.  I immediately thought of some kind of pasta dish and looking through my Everyday Happy Herbivore cookbook I found this awesome meal that would make a perfect Memorial Day dinner.  This meal is so delicious and easy to make, I will definitely be making it again sometime in the future.

This recipe is adapted from Everyday Happy Herbivore cookbook.  For a family of four, I doubled this recipe and made a few minimal changes:

Ingredients:
  • 16 ounces whole-wheat spaghetti
  • 2 pints cherry tomatoes, sliced in half (I used slightly more)
  • Juice of 2 lemons
  • 1/2 cup fresh basil, chopped
  • 4 tbsp capers (or more, if desired)
Directions:
  1. Cook pasta according to the directions on the pasta.  One minute before the pasta is done, add the tomatoes to the cooking water and cook with the pasta to help them slightly soften.
  2. Drain, and rinse pasta and tomatoes briefly with cool water so the pasta is warm.
  3. Return the pasta to the pot and add the lemon juice, fresh basil, and capers.  Mix to combine. Serve warm or refrigerate and eat this chilled.


It is amazing how these flavors combine together with the pasta to create such an intense taste!