Pages

Wednesday, October 31, 2012

Walnut Pumpkin Pie

Happy Halloween!  Since it is Halloween, I have got to keep the pumpkin recipes going and what a perfect time to make a delicious pumpkin pie!


Since I do not eat a lot pretty much all of the typical Halloween candy, I figured I should make a pumpkin pie.  A no-bake, vegan, gluten free one of course!  Plus, I had to try out this recipe before Thanksgiving because I wanted to make it again for Thanksgiving if it was a success.  I am so happy it was, because this pie is filled with healthy omega-3's, vitamin A, and fiber.


Some other benefits of this pie:
  1. Super easy to make, just mix everything in a blender.
  2. Which means super easy to clean up, just the blender and a few measuring spoons.
  3. You don't have to stay at home waiting for it to bake, just put it in the fridge and you can run errands outside the house.

This recipe was adapted from Healthy Happy Life.  She lists quite a few alternative ways to make this recipe so definitely check out the original recipe to suit your taste buds and preferences.  Here's the recipe I used:

Crust Ingredients:
  • 1/3 cup raw walnuts
  • 1/2 cup gf rolled oats
  • 2 tablespoons organic coconut sugar
  • 1/2 tsp salt
Filling Ingredients:
  • 1/4 cup almond milk
  • 1 tablespoon chia seeds
  • 1 15oz can pumpkin puree
  • 1/2 cup organic coconut sugar
  • 1/2 cup raw walnuts
  • 3/4 tsp salt
  • 1 1/2 tsp pumpkin pie spice
  • 1/4 cup organic virgin coconut oil (melted)
Directions:
  1. To make the crust, mix together all ingredients in a food processor until well blended and mixture holds together.
  2. Press crust into a greased pie pan and set aside.
  3. To make the filling, mix together almond milk and chia seeds. (This is done first to allow the chia seeds to form a gel in the almond milk.)
  4. In a blender, combine pumpkin, coconut sugar, walnuts, salt, and pumpkin pie spice.  Blend until smooth and creamy.
  5. Add in the almond milk and chia seed mixture.  Blend until incorporated.
  6. Add in the coconut oil.  (Do this quickly, and make sure the coconut oil is very warm so it does not harden too quickly in the pumpkin mixture, unless you have a vitamix and can add the coconut oil with the blender on a low setting.)  
  7. Blend until everything is combined.  You may need to scrape down the sides of the blender as needed.
  8. Pour filling into prepared pie pan.  Smooth the filling with a spatula so it is smooth and even.
  9. Place in the refrigerator and let it sit for at least 4 hours, but the longer it sits the more it will firm up. (I let mine sit overnight.)

I chose to make a crustless pie.  I was never the biggest fan of the crust part of the pie, I would rather just eat the filling!  However, this pie was not the firmest and probably would have held together better with the crust, so I think next time I will make the crust too.  If you prefer no crust and want a firmer pie, try adding more coconut oil, probably about 1/3-1/2 cup.)

Walnut Pumpkin Pie before slicing!


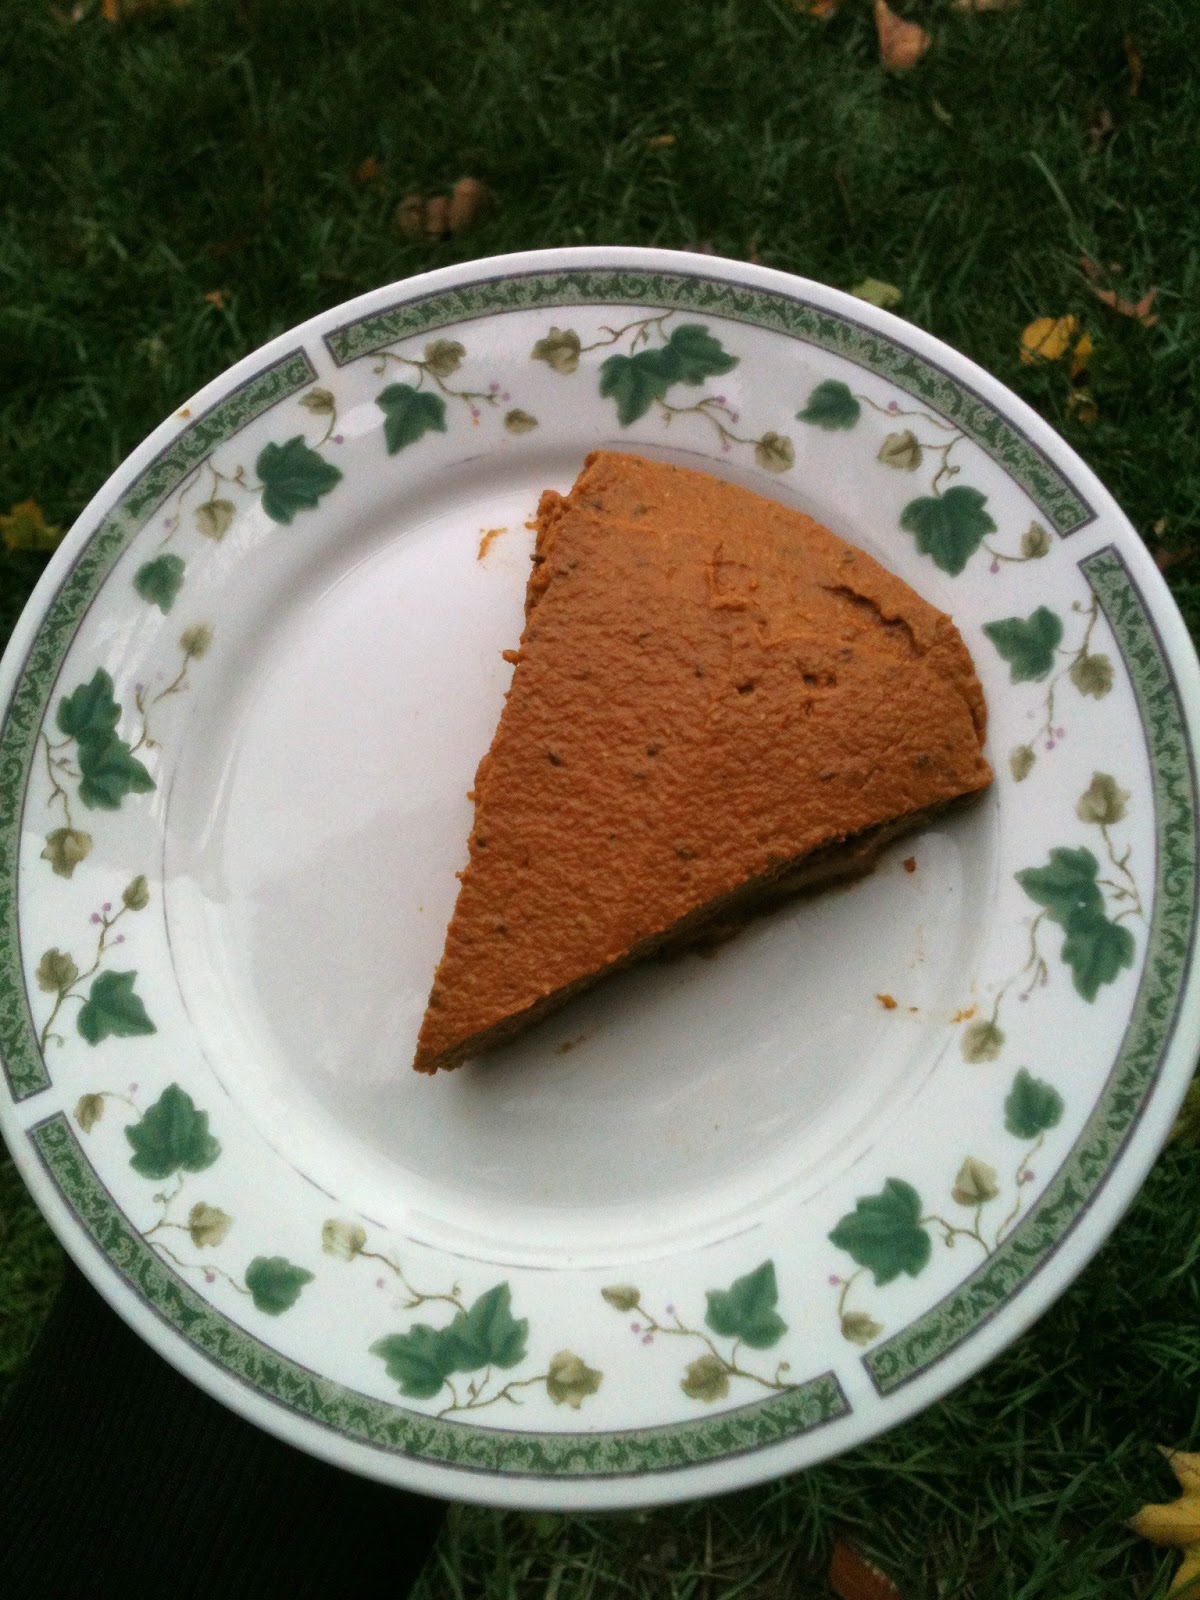
This pie tasted so good!
What a great treat to celebrate with on Halloween!


Based on using original Silk PureAlmond Milk and cutting the pie into 8 slices:
For one slice with no crust this recipe yields approximately 228 calories and 2.5g protein.
For one slice with crust this recipe yields approximately 298 calories and 4g protein.

Tuesday, October 30, 2012

Pumpkin TVP Oats

Yesterday was National Oatmeal Day!  OMG I love oats!  I love how once you cook your oats you have a wide variety of flavor options by adding different fruits and toppings each time.  I could never get bored of having oatmeal every day for breakfast just because of this reason.

In the summer I really started to eat them after hearing about Overnight Oats.  I loved that I could prepare them the night before and in the morning breakfast was already waiting for me.  Also, by sitting overnight, the oats really soaked in the almond milk so that the oatmeal was quite voluminous.

Now that the weather is cooler, I have been enjoying a warm bowl of oats in the morning.  I still prepare the oats the night before to save time (especially on work days) and to continue to allow the oats to soak in the almond milk for extra volume.  In the mornings, I quickly reheat it in the microwave while preparing a hot cup of coffee.

Even though this oatmeal post is a day late for National Oatmeal Day, I still ate oatmeal for breakfast yesterday morning.  Though the recipe I'm sharing is not the bowl of oatmeal I ate yesterday.  Yesterday's bowl was just oatmeal with dark cocoa powder and a banana.  This recipe is a new idea on how to add more volume and protein to your breakfast and kept me fuller longer.  It's a genius idea.


This recipe was adapted from here:

Ingredients:
  • 1/4 cup TVP
  • 3/4 cup almond milk
  • 2 tbsp gf rolled oats
  • 1 tsp flax seeds
  • 2 tbsp pumpkin puree
  • 1/2 tsp cinnamon
  • 1/4 tsp ginger
  • pinch of cloves
  • 1 tbsp walnuts (optional for topping)
  • 1 tbsp raisins (optional for topping)
Directions:
  1. In a microwave safe bowl, combine all ingredients except walnuts and raisins.  
  2. Microwave for 2 minutes.  Stir.  Microwave for another minute or until all the liquid is absorbed.  Make sure to watch closely so it does not overflow.
  3. If desired, top with walnuts and raisins.
If you like sweeter oats, you can also add a sweetener to taste.  Maple syrup would probably be a great sweetener for this oatmeal bowl.

I actually didn't prep this meal the night before and made it in the morning.  I'm definitely making this the night before next time because the longer the TVP sits in the liquid the more it absorbs and the more volume.  To prepare this overnight just combine everything together, refrigerate (or heat first if desired for extra chewiness, then refrigerate), reheat in the morning, and add the optional toppings.

I can't wait to try other flavor varieties using TVP as "oatmeal".  
It's a great way to get a great amount of protein first thing in the morning!


Based on using original Silk PureAlmond Milk, walnuts, and raisins:
This recipe yields approximately 325 calories and 17g protein.

Monday, October 29, 2012

Vegetable Lentil Stew

This Monday the letter for Meatless Monday's from A to Z begins with L for Lentils.


Surprisingly, I have never cooked with lentils before.  I always found that if I wanted beans it was easier to grab a can of chickpeas or black beans that just needed to be heated or just grab a can of pre-made lentil soup (like I did Saturday night for dinner.)  This really is not an excuse to not cook lentils since all that is required is tossing some lentils with water in a pan and letting them cook for 30-40 minutes.  What could be more difficult?  However, with this recipe I still cheated because I did not pre-cook the lentils.  I simply tossed them into a crock pot to make this soup.  I'm still without a kitchen and needed something easy and not time consuming.  Plus, I wanted dinner ready for me when I came home.


This recipe was adapted from FatFree Vegan Kitchen.  I made several changes to the original recipe.  Here is how I made my Vegetable Lentil Stew:

Ingredients:

  • 1 small onion, chopped
  • 4 cloves garlic, minced
  • 2 16-oz packages frozen vegetables (I used one that was a vegetable soup mixture)
  • 1 15-oz can diced tomatoes
  • 4 cups vegetable broth
  • 1 1/2 cups dry lentils
  • 1/3 cup quinoa
  • 2/3 cup canned pumpkin
  • 1 1/4 tsp oregano
  • 1/2 tsp paprika
  • 1/2 tsp cumin
Directions: 
  1. Combine all ingredients in a crock pot.  
  2. Stir to combine everything together.  
  3. Allow to cook for approximately 6-8 hours.

Possible Variations:
  • To make this even more simple you can use onion flakes and minced garlic (the kind you keep in the fridge). Just follow the directions on the containers to add the appropriate amounts. 
  • You can also precook the lentils if you want them to be softer.
  • If you want to (and have that luxurious time) you can can buy fresh vegetables to chop.
  • I also like more spice so I added some Sriracha sauce to my own bowl of stew.


One thing I really like about this stew is you can buy different types of frozen vegetables each time to have a different variety of stew!


I am roughly estimating that this recipe yields 12 cups.
Based on one cup:
Approximately 127 calories and 6.5g protein

Sunday, October 28, 2012

Banana Nut Taco

I love nut butter!  I love bananas!  I love them combined together!  I love creative ways to eat them!  And I love giving the snack a fun name!


This isn't really a recipe, just a great idea I had to quickly and easily eat a banana with nut butter.  All you do is unpeel a banana.  Then, drag a knife through the banana lengthwise to carve out the middle to hold the nut butter like a taco holds its fillings.  Now add your favorite nut butter: peanut butter, almond butter, cashew butter, walnut butter, pecan butter, sunflower seed butter, pumpkin seed butter, etc.  Or make a combination!  I once added chocolate peanut butter (love PB&Co. brand) to half the banana and the other half had sunflower seed butter!

This was a huge banana with crunchy peanut butter! 
Lately, I have been adding almond butter and the "filling" is overflowing the banana!
I seriously eat this snack like it's my job!

Tuesday, October 23, 2012

Green Breakfast Pudding

Yesterday was Meatless Monday from A to Z with this Monday's letter as K for kale.  For my kale recipe I made Mint Chocolate Chip Pancakes.  Since I had lots of leftover kale I decided to try another new breakfast recipe with kale.  This was like eating a green smoothie in a bowl!


This recipe was adapted from Healthful Pursuit.  I made a few changes to the original recipe.

Ingredients:

  • 1/2 cup yogurt (I used plain Silk soy yogurt)
  • 1 frozen banana
  • 1 cup fresh kale
  • 1 tablespoon ground flax
  • 1 tablespoon lemon juice
  • 30 green grapes
Directions:
  1. In a blender, combine yogurt, banana, kale, flax seeds, and lemon juice.  Blend until smooth and creamy.
  2. Put grapes in a serving bowl and pour smoothie batter on top.
This recipe can make one big bowl or two small bowls. (If making 2 servings, it is recommended to put 15 grapes in 2 separate bowls then add half the smoothie batter to each bowl.)

I love green food!

This breakfast is a great way to start your day with lots of fruit, some greens, and protein all in one meal first thing in the morning!


Based on the entire recipe:
Approximately 318 calories and 7.5g protein


Monday, October 22, 2012

Mint Chocolate Chip Protein Pancakes

This week we are on the letter K for Meatless Mondays from A to Z and K is for Kale.


I love kale and use it all the time.  Usually, I saute it on the stove top with some balsamic vinegar and red wine vinegar and add some nutritional yeast, and maybe some garlic and onion powder.  Then, I eat it either straight from the pan as a side dish or maybe mix in some chickpeas and/or tempeh to make it more of a meal.

I also add kale to smoothies a lot.  So this week I wanted to try something different.  I decided to add kale to my pancakes!  This is actually something I have been meaning to do since the summer, except using spinach instead of kale, which of course works too!  In fact, the original recipe calls for spinach.  Feel free to try this recipe with kale or spinach, I personally think kale has a bolder flavor though so if you are hesitant in adding greens into your pancakes you may want to try the spinach first.  I know green pancakes might not look the most appetizing, but trust me these are delicious!


This recipe was adapted from here:

Ingredients:

  • 1/4 cup GF bisquick*
  • 1 scoop protein powder* (I used Sunwarrior Blend Vanilla where 1 scoop equals 21g)
  • 1/2 teaspoon baking powder
  • 3/4 cup almond milk, divided
  • 1 cup packed kale
  • 1/2 teaspoon vanilla extract
  • 1/8 teaspoon mint extract
  • 1 flax egg
  • 1 tablespoon chocolate chips
Directions:
  1. In a medium bowl, combine bisquick, protein powder, and baking powder and whisk together.
  2. In a blender, add 1/4 cup almond milk, kale, vanilla extract, and the mint extract.  Process until the kale has broken down.
  3. Pour the kale mixture into the dry ingredients.  Add the flax egg and stir to combine.  The batter will be very thick.  Add more almond milk if the batter is too thick starting with 1/4 cup and possibly adding the extra 1/4 cup.  (Mine needed a total of 3/4 cup almond milk to reach a pancake consistency, but this can vary depending on the type of flour/protein powder you use.)
  4. Pour batter by 1/4 cup onto a hot griddle over medium-low heat.  Add a few chocolate chips to the top of each pancake and cook until lightly golden on each side.
* You can use whole-wheat flour or a GF flour instead of the bisquick.  You can also omit the protein powder, if desired, but then increase the bisquick or flour to 1/3 cup.

With this recipe, I was able to make 5 medium-sized pancakes.

Here's a picture before the pancake cooked
 (it looked greener in person, I don't have the best lighting.) 
 I wish they stayed this green instead of turning golden brown when cooking.


I loved the minty taste and the sweet chocolate!  Topped with pure maple syrup, these made a very tasty breakfast.  Not only are they tasty, but they are packed with protein, and the kale adds tons of vitamins A and C!  What a great way to start the morning!

For another green breakfast with kale, check out this Green Breakfast Pudding!


Based on using GF Bisquick, original Silk PureAlmond Milk, and Sunwarrior 
Blend Vanilla Protein Powder, this entire batter yields approximately:
349 calories and 24g protein


Friday, October 19, 2012

Strawberry Rhubarb Muffins

I haven't posted a sweet treat recipe in awhile so thought these Strawberry Rhubarb Muffins would be perfect!


These muffins make a great breakfast, snack, or a guilt-free treat at the end of a long day.  You can also try crumbling them on top of a yogurt bowl , on top of warm oatmeal, or simply add some fresh strawberry jam on top of a muffin for another variation!


This recipe was adapted from here:

Ingredients:

  • 1/2 cup buckwheat flour
  • 1/4 cup brown rice flour
  • 1/2 cup sweet sorghum flour
  • 1/4 cup raw sugar
  • 3 teaspoons baking powder
  • 1/2 teaspoon salt
  • 1 teaspoon cinnamon
  • 1 cup gf rolled oats
  • 1 flax egg
  • 1 cup almond milk
  • 2 tablespoons vegetable oil (or sub applesauce, but it will be gummier)
  • 1 cup fresh rhubarb, chopped
  • 1 cup fresh strawberries, chopped

Directions:

  1. Preheat oven to 425F and line a muffin tin with cupcake liners.
  2. In a large bowl, whisk together the flours, sugar, baking powder, salt, and cinnamon.
  3. Stir in the oats.
  4. Gently fold in the flax egg, milk, and oil until just combined.
  5. Gently stir in rhubarb and strawberries.
  6. Pour into prepared muffin tin and and bake for approximately 15 minutes.

Following this recipe, I was able to make 16 medium sized muffins.  There are quite a lot of ingredients but it's all just measuring and then stirring everything together.  So for making 16 muffins it really couldn't get much easier.  Oh, and of course the cleanup is super easy too : )


Based on  making 16 muffins and using original Silk PureAlmond Milk, 1 muffin is approximately:
With vegetable oil: 103 calories and 2.5g protein
With applesauce: 88.5 calories and 2.5g protein

Tuesday, October 16, 2012

Sweet and Spicy Tofu

Yesterday, I posted a recipe for Jalapeno Cornbread.  If (like me) you have leftover cornbread, here is another great meal to pair with the cornbread.

Basically, I was in the mood to make some tofu and wanted to try something new instead of using my typical marinade when I bake tofu or tempeh.  I found a recipe with some different marinade ingredients and it was very tasty!

Ingredients:

  • 1 block of extra-firm tofu
  • 3 tablespoons tamari
  • 3 tablespoons maple syrup
  • 3 tablespoons bbq sauce
  • 2 tablespoons ketchup
  • 2 teaspoons apple cider vinegar
  • 2 teaspoons hot sauce
Directions:
  1. Press tofu to remove all excess liquid.  Cut into cubes and freeze overnight, if desired.  
  2. Combine all marinade ingredients in a container and place tofu in the marinade making sure all pieces are covered.  Place lid on container and put in the fridge for at least one hour.
  3. Preheat oven to 375F and line a baking sheet with foil.
  4. Place tofu on the baking sheet and bake for 20 minutes.
  5. After 20 minutes toss the tofu pieces, spoon some extra marinade on top, and continue baking for another 10 minutes or longer depending on how you want the texture of your tofu.  
  6. For extra chewiness, place under the broiler for about 3 more minutes.

After I baked my tofu, I served it atop of brown rice and kale that was made with balsamic vinegar, red wine vinegar, and nutritional yeast!


Sunday, October 14, 2012

Jalapeno Cornbread

This week's Meatless Mondays from A to Z begins with the letter J and was made with the ingredient Jalapenos!

I have never used jalapenos to cook with before so was excited to give this ingredient a try.  The most typical recipe to make with jalapenos is probably a salsa, hummus, or maybe even some kind of chili.  For my recipe, I had just remembered looking through the Everyday Happy Herbivore cookbook and seeing a recipe for jalapeno cornbread.  Ooh, cornbread sounded delicious and since I still do not have a kitchen I knew this cornbread would pair well with an easy crockpot chili, my Hominy Chili that I made two weeks ago!


 This recipe is adapted from Everyday Happy Herbivore.  Here is how I made my Jalapeno Cornbread:

Ingredients:
  • 1 1/2 cup yellow cornmeal
  • 1/2 cup gf all-purpose flour
  • 1 tbsp baking powder
  • 1/2 tsp sea salt
  • 1 cup almond milk
  • 1/4 cup unsweetened applesauce
  • 1/4 cup agave nectar
  • 1 cup frozen yellow corn (can also use fresh or canned)
  • 1 jalapeno, minced (use 1 tbsp for much less spicy taste)
Directions:
  1. Preheat oven to 400F and line an 8x8" baking pan with parchment paper.
  2. In a medium bowl, combine cornmeal, flour, baking powder, and sea salt and whisk together.
  3. Add almond milk, applesauce, and agave and gently stir to incorporate all ingredients together.
  4. With a spatula, gently fold in the corn and jalapeno until everything is just combined.
  5. Pour into your prepared pan and bake for about 20-25 minutes or until a toothpick inserted in the center comes out clean.

I wanted a denser cornbread so I altered the original recipe and added 1/2 cup extra cornmeal and reduced the flour by 1/2 cup.  Play around with the ingredients to determine how you best like your cornbread: 
  • More cornmeal = more dense cornbread
  • More flour = more cakelike cornbread
You could also try a different flour to give this cornbread a slightly different taste.  Just keep the total amount of grains at 2 cups and you're cornbread should turn out great!

If you want a sweeter cornbread, try adding about 2 tablespoons of raw sugar.  I didn't think I would like a sweeter cornbread so I did not add it originally, but I am definitely going to add it next time.  I think the extra sweetness will really help bring out the flavor.


Enjoy this cornbread as a snack, or serve it alongside some warm chili, stew, or soup during these cooler fall months!


This recipe yields 9 squares.
Based on 1 square:
Approximately 140 calories and 2g protein.


Tuesday, October 9, 2012

Cashew Tomato Sauce

This sauce is very fresh tasting and tastes great over regular cooked pasta or veggie noodles (spiralized veggies).  I used a julienne peeler to make my veggie noodles out of squash, zucchini and carrots.


The recipe for the sauce was adapted from here:

Ingredients:
  • 1 pint of cherry tomatoes
  • 1/2 cup raw cashews (soaked for at least 30 minutes and drained)
  • 1 clove garlic
  • 1 medjool date, pitted
  • 1/2 tablespoon wine vinegar
  • ground black pepper, to taste
Directions:
  1. Combine the tomatoes, cashews, garlic, date, and wine vinegar in a blender and process until smooth.
  2. Taste the sauce once it is smooth and add pepper and adjust seasonings to taste.
  3. Serve over hot pasta or cold veggie noodles.
Veggie noodles before adding sauce.


Veggie noodles with sauce before stirring.


This sauce is best the day it is made.  I love how this sauce is extremely simple to make and only the blender needs to be cleaned afterwards.


Monday, October 8, 2012

Apple Cinnamon Quinoa

This Monday for Meatless Mondays from A to Z we are on the letter I which is for Israeli Couscous.


Unfortunately, this ingredient is not gluten free.  Instead of using couscous, I decided to use a similar substitution with quinoa.  Since I use quinoa so much in my regular daily meals, I decided to try something new with it since I cannot use a new and different ingredient.  Usually when I use quinoa, I mix it with beans and vegetables.  I have also used it as a cold cereal with fruit.  Today, I decided to use it as a hot breakfast for the first time!


This recipe was adapted from Fit Foodie Finds:

Ingredients:

  • 1/4 cup dry quinoa
  • 1/4 cup almond milk
  • 1/4 cup water
  • 1/4 teaspoon cinnamon
  • 1 packet of stevia
  • 2 tablespoons raisins
  • 1 tablespoon chia seeds
  • 1 medium apple, chopped
Directions:
  1. In a small saucepan, bring quinoa, milk, and water to a boil.
  2. Reduce heat and cover.  Simmer on low for about 10 minutes.
  3. Add the remaining ingredients.  Continue to cook on low until all the liquid is absorbed, about 10 minutes.
  4. Pour into a bowl and eat served hot!

I wanted my breakfast to be more like a cereal so I added extra almond milk after I cooked it and poured it into a bowl.  It was so tasty!


Approximately 400 calories and 8g protein.

Saturday, October 6, 2012

Fruit and Nut Granola

Since I do not currently have a kitchen due to remodeling, I needed a simple no-bake granola with minimal clean-up.  I came across this recipe online and I absolutely love it!  It's not really a crunchy granola but makes a great alternative to cereal.


This recipe was adapted from here:

Ingredients:

  • 1/4 cup dates (soaked in water)
  • 1/4 cup almonds (soaked for 8 hours)
  • 1/4 cup walnuts (soaked for 8 hours)
  • 1/4 cup pecans (soaked for 8 hours)
  • 1/4 apple, chopped (about 2 slices)
  • 1/2 tsp vanilla
  • 1/2 tsp cinnamon
  • 1/8 tsp sea salt
  • 1/4 cup pumpkin seeds
  • 1/4 cup raisins
  • 1/4 cup cranberries
Directions:
  1. In a food processor, place dates and a little of the soak water and blend until smooth.
  2. Add the apple, vanilla, cinnamon, and sea salt and pulse until coarsely chopped.  Pour into a medium bowl. 
  3. Drain the nuts and place them in the food processor.  Pulse until coarsely chopped and pour into the same bowl as the date paste mixture.
  4. Stir in  pumpkin seeds, raisins, and cranberries until everything is well combined.  Store in an airtight container in the fridge for up to 1 week.

This granola can be used to top oats or yogurt, but my favorite is to eat it as a cereal.  Just put some in a bowl and pour almond milk on top for a delicious, filling, and healthy breakfast!


Based on a 1/4 cup serving:
Approximately 144 calories and 3.5g protein.

Monday, October 1, 2012

Hominy Chili

This Monday for Meatless Mondays from A to Z uses the ingredient Hominy for the letter H.


Since my family is in the process of remodeling and we do not have a kitchen, I was afraid this challenge would be difficult.  At first, I thought I would just do something simple with hominy grits, but then I came across this recipe for a chili and thought I could make it in the crockpot.  I am so glad I decided to try out this chili because it is the simplest recipe ever! And so tasty we all went back for seconds!


This recipe was adapted from here:

Ingredients:
  • 1 (20 oz) can hominy
  • 1 cup kidney beans, drained and rinsed
  • 1 cup black beans, drained and rinsed
  • 1 (15 oz) can diced tomatoes, undrained
  • 1 (15 oz) can stewed tomatoes, undrained and quartered
  • 1 (8 oz) can tomato sauce
  • 1 cup Textured Vegetable Protein (TVP)
  • 1 cup vegetable broth
  • 2 teaspoons minced garlic
  • 1 teaspoon ground cumin
Directions: Combine all ingredients in a crockpot and stir to combine.  Turn crockpot to low and let it simmer until the TVP has soaked up most liquid.  (I just made this in the early afternoon and let it simmer on low all day so it would be done and warm for dinner.)

In the crockpot, ready to be eaten!

This recipe is so easy and tasty.  I will be making this recipe a lot this winter!


I'm estimating that this recipe yields 8 cups. Based on a 1 cup serving:
Approximately 169 calories and 11.5g protein.