Pages

Friday, August 31, 2012

Peach Hemp Smoothie

I love protein smoothies after working out.  I had recently frozen some peaches and knew they would be a perfect ingredient for a fruity smoothie.  Instead of adding my usual protein powder, I thought about switching it up and adding hemp seeds, which are very high in protein.  The combination was perfect and so delicious!  I really enjoyed this after my workout!


Ingredients:
  • 1/2 frozen banana
  • 1 frozen peach
  • 1 tbsp hemp seeds
  • 1/2 cup almond milk (I used Almond Coconut flavor)
Directions:
  1. Thaw fruit so that it will easily blend in a blender (unless using a high speed blender). 
  2. Combine all ingredients in a blender and blend until smooth and creamy!


Tip: To have fruit thawed and ready to go right after a workout, I actually put the frozen banana in the fridge (they thaw really fast and I wanted it thawed and cold, but not brown and warm) and put the frozen peach on the counter to thaw before I went to work out.  When I got home the fruit was at a perfect state to be blended into my smoothie.


This was super quick to make after working out so that I was able to get all that nutrition right when my body needed it most!

Thursday, August 30, 2012

Pumpkin Protein Muffin

I have been seeing a lot of microwaveable protein muffin recipes floating around.  They look so good as a way to start the morning since they are packed with protein and can be made so quickly.  Unfortunately, most of the protein muffin recipes I have seen include an egg.  I have tried so many times to replace the egg with a flax egg but I guess my wet to dry ingredient proportion was off because my protein muffins were not working out - they were too soupy.


I finally came across this one that didn't require an egg, but already included a flax egg in the directions, so I thought I would give it a try and I'm glad I did!  It was so easy, came out perfectly, it was filling, and delicious.  What a great healthy, breakfast!


This recipe was adapted from here:

Ingredients:
  • 1 scoop protein powder (21 g) (I used brown rice protein powder)
  • 1/4 tsp cinnamon
  • 1/8 tsp baking soda
  • 1/4 tsp vanilla extract
  • 1/4 cup pumpkin puree
  • 1 flax egg
Directions:
  1. In a microwave-safe bowl, ramekin, or mug combine protein powder, cinnamon, and baking soda and mix together.
  2. Add in vanilla, pumpkin, and flax egg and mix until well incorporated.
  3. Microwave for 3 minutes, watching carefully that it does not spill over. 
  4. Let it cool for 1 minute.  Then, take a knife and loosen the muffin from the side of the bowl.  Flip it over onto a plate.  Top with maple syrup, nut butter, jam, yogurt, etc.

While your already measuring out the ingredients for one, you might as well make a few extra.  (That pumpkin will need to be used anyway :-p ) Plus, then you will have some ready to go breakfasts for days when you need to grab something quick.


These muffins can also make a great snack or dessert!

Wednesday, August 29, 2012

TVP Sloppy Joes

About a week ago I made these Chickenless Nuggets with Textured Vegetable Protein (TVP) that someone gave me.  I noticed the sell by date was getting close so I googled some ideas on what I could do with the rest of the TVP and came across this recipe for sloppy joes.  OMG!  I have not had a sloppy joe in years, but this stuff tasted just like Manwich, only it was better because there is no meat.

This recipe was adapted from here.  I made a few changes based on the reviews of the recipe online.  Here is how I made my TVP Sloppy Joes:

Ingredients:
  • 1 large onion, chopped
  • 1 large green pepper, diced
  • 1 tbsp olive oil
  • 1 1/2 cups boiling water
  • 2 cups tomato sauce
  • 1/2 cup ketchup
  • 1/2 tbsp chili powder (add more for a spicier kick)
  • a pinch of pepper
  • 1 tsp salt
  • 1 tbsp tamari
  • 1 tbsp mustard
  • 1 tbsp raw sugar
  • 1 1/2 cups dry TVP
Directions:
  1. Saute the chopped onion and green pepper in olive oil over medium heat for 3-5 minutes.
  2. Add all other ingredients and simmer together over medium low heat for 20 minutes.

Do not be overwhelmed by the ingredients.  It took me maybe 3 minutes to chop the onion and green pepper (I used a food processor) and another 5 minutes to saute them.  Then while that was sauteeing I measured everything else out.  Finally, I added everything in the pot and did some other things for 20 minutes. 

  Simmering in the pot!
This meal is very minimal prep work, very simple directions, very easy clean up, very tasty! It practically cooks itself!  Next time I make this, I'm doubling the recipe so there will be more leftovers!


I am roughly estimating that this makes about 8 servings.  One serving (without bread) is approximately 138 calories and 9.5g protein.


Tuesday, August 28, 2012

Blueberry Beet Overnight Oats

I bought some beets for this Beet Juice (which was very tasty btw) but the beets I bought came in a pack of 3 and I only needed 1/2 a beet for that juice.  The other 1/2 of that one beet went into a juice that didn't turn out right :( But I still had 2 whole beets left.  Instead of just boiling the beets and eating them plain or in a salad, I kept my eyes open as I read blogs and surfed the internet hoping to find a new recipe to try for anything that had beets.  Surprisingly I found one and it used beets for breakfast in oatmeal!  I never would have thought of that idea so I tried it out.


This recipe was adapted from here:

Ingredients:
  • 1/4 cup boiled beets
  • 3/4 cup almond milk
  • 1 tbsp chia seeds
  • 1/4 cup gf rolled oats
  • 1 handful blueberries
  • sweetener of choice, to taste (I used agave)
Directions:
  1. In a blender, puree beets and almond milk together until smooth.
  2. Pour into a mason jar and mix in chia seeds, oats, and blueberries.
  3. Put in the fridge overnight.  In the morning, add sweetener and if desired top with additional blueberries.

I was surprised at how sweet this tasted!  The beets and blueberries make a great combination.  And the best part of this breakfast was the color - it was so bright! (Which my camera did not do too well a job of capturing.)


Monday, August 27, 2012

Banana Date Protein Bars

It is the 4th week in Meatless Mondays from A to Z so today's recipe was inspired by Dates.  Oh, and it is also Banana Lover's Day!  When I came across this recipe that included dates and bananas, I knew it would be perfect for today!

Better With Veggies

The original recipe calls for 2 small bananas and 2/3 cup almond milk.  My bananas were big so I used 1 full banana and 1/2 of another.  I also reduced the almond milk to 1/3 because the batter was already very liquidy.


This recipe was adapated from Healthy Helpings.  Here's how I made my protein bars:

Ingredients:
  • 12 dates
  • 1/4 cup boiling water
  • 1 1/2 small ripe banana
  • 1/3 cup almond milk
  • 2 tbsp dried fruit (I used a dried fruit mix)
  • 3 scoops of protein powder (about 60 grams)
  • 1 tsp baking soda (omit if making raw bars)
  • 1 tsp vanilla extract
  • 1 tsp cinnamon
Directions:
  1. Place the dates in a small bowl and cover with the boiling water.  Set aside to soak until they are soft.
  2. Preheat the oven to 300F and line a baking sheet with parchment paper.  Set aside.
  3. Place the bananas, dates, and date soaking water in a food processor or blender.  Blend until a paste forms.
  4. Transfer the mixture to a bowl and add the almond milk.  Stir until combined.
  5. Add the remaining ingredients and mix until evenly combined being careful not to overmix the batter.
  6. Spread the mixture along the bottom of the prepared pan and bake for about 40 minutes.
  7. Remove from the oven, let the bars cool, and cut into individual servings.  (I cut mine into 9 squares).  Wrap each bar with suran wrap and store in the fridge.
I actually baked my bars for 45 minutes and the bars were still pretty soft.  After cooling the pan, I actually put the mixture in the freezer to freeze before cutting because they were so soft.  I think next time I make these I will omit the baking soda and just put them in the freezer until they harden before cutting and wrapping each bar.  I'm also storing these in the freezer so they will continue to hold together well and last longer.  When I want one I just take it out for about 5 minutes before eating!  I'm sure these also taste great warm.  If you store them in the fridge, you only have to heat them up for about 10 seconds before enjoying!

Side view!


Even though these bars didn't come out as expected, I really enjoyed them.  The flavors of the banana, dates, and cinnamon really stood out.  I love how these bars are packed with protein and naturally sweetened for a sweet and healthy treat!


Sunday, August 26, 2012

Mashed Cauliflower

Here is a yummy way to get extra veggies!  Instead of mashed potatotes, it's mashed cauliflower. 


This recipe was adapted from Choosing Raw:

Ingredients:
  • 1 head of cauliflower - washed, trimmed, and roughly chopped
  • 1/4 tsp dried thyme
  • 1/4 tsp salt, or to taste
  • dash of black pepper
  • 2 tbsp nutritional yeast
  • 2 small cloves garlic
  • 2 tbsp almond milk
  • 3 tbsp lemon juice
Directions:
  1. Bring a large pot of water to a boil.  Add prepared cauliflower and cook until tender.
  2. Drain cooked cauliflower and transfer to a food processor and pulse until the cauliflower is broken down.
  3. Add thyme, salt, black pepper, nutritional yeast, garlic, almond milk, and lemon juice and blend until smooth and creamy.  You can also add additional seasonings or adjust measurements to your taste.  Serve this side dish hot!

This mashed cauliflower is quick, easy, and very tasty!


Saturday, August 25, 2012

Blueberry Yogurt Parfait

I had another yogurt parfait for breakfast this past week, this time with blueberries!  I followed the same recipe as my other two yogurt parfaits, Peach Yogurt Parfait and Cherry Yogurt Parfait, just switched up the fruit.


Ingredients:

  • 1/2 cup yogurt (I used Silk vanilla soy yogurt)
  • handful of blueberries 
  • granola (I used this homemade Light Granola)
  • 1/2 tablespoon chia seeds
Directions:
  1. Stir chia seeds into the yogurt.
  2. Layer the parfait however you want. I added blueberries, then yogurt, then granola, and repeated.
  3. If desired, sprinkle additional chia seeds on top!

I should try combining different fruits together sometime!

Friday, August 24, 2012

Chickenless Nuggets

I was in the mood for some nuggets the other day for dinner.  At first, I thought I would just turn a recipe for bean patties into smaller bite-sized nuggets.  But then I remembered that someone had given me some Textured Vegetable Protein (TVP) that needed to be used so I googled recipes for nuggets using TVP.  This recipe was perfect because I do not like breading nuggets since it is so hard to find bread crumbs (or crackers to turn into crumbs) that are gluten free and vegan.  Plus it was a very simple recipe!


This recipe was adapted from here:

Ingredients:
  • 1 cup boiling water
  • 1 vegetable bouillon cube
  • 1 cup TVP
  • 2 tbsp chickpea flour
  • 1 flax egg
  • spices, to taste
Directions:
  1. Preheat oven to 450F.
  2. Combine boiling water with a vegetable bouillon cube in a medium bowl and stir until dissolved.
  3. Add TVP, stir, and set aside for 5 minutes.
  4. In a food processor, pulse the soaked TVP until it is broken down into smaller pieces (but not too small).
  5. Add flax egg and flour and mix until well combined.
  6. Season with any spices you would like and mix to combine.
  7. Form nuggets with your hands and place on a prepared baking sheet.
  8. Bake in the oven for 10-15 minutes, flip, and bake for an additional 10-15 minutes or until golden.
I was able to make about 15 nuggets with this recipe, but the amount will depend on the size nuggets you form.


The TVP definitely added that chicken like texture and the seasonings gave these nuggets a great taste.  This recipe was so easy to make and required very little clean up. 

The inside of these chickenless nuggets!
 

I will definitiely be making these again!

Thursday, August 23, 2012

Green Monster Overnight Oats

Here's another overnight oats recipe!  My other overnight recipes so far include:

Chocolate Oatmeal (a version of cooked overnight oats)
Mango Almond Overnight Oats
Strawberry Banana Overnight Oats

Today's recipe includes leafy greens, which is a great way to start your day!


This recipe was adapted from Oh She Glows:

Ingredients:
  • About 1 cup kale or spinach
  • 1/2 large ripe banana
  • 1 tbsp chia seeds
  • 1/2 cup almond milk
  • 1/4 cup gf rolled oats
Directions:
  1. In a blender, blend together spinach, banana, chia seeds, and almond milk until smooth.
  2. In a glass jar (or cereal bowl), add the oats and then pour the green smoothie on top and stir until well combined.
  3. Place in the fridge overnight.  In the morning, stir and add desired topping such as nut butter, granola, coconut, fruit, etc. and serve cold. 
 I added granola to mine in the morning because I thought this needed some crunch.


I love how I got a serving of vegetables first thing in the morning and you couldn't even taste the greens (I mostly tasted the banana).


Based on using Bob's Red Mill Gluten Free Rolled Oats, Original Silk PureAlmond Milk, and kale, this recipe yields approximately 260 calories and 8g protein.


Wednesday, August 22, 2012

3 Bean Pasta

About a week ago I posted my 3 Bean Taco Salad I made with black beans, chickpeas, and kidney beans.  I mentioned how since I only used a few spoonfuls of each type of bean in my taco salad, I had plenty of extra beans in the fridge ready to be eaten.  After enjoying my spicy taco salad with the 3 different beans, the next day for dinner I was ready to use the 3 different types of beans in a pasta dish.  This meal, just like the taco salad, was super easy to make; it doesn't even really call for a "recipe" since all I did was combine pasta, sauce, and beans!


Ingredients:
  • a spoonful of chickpeas
  • a spoonful of black beans
  • a spoonful of kidney beans
  • pasta (I used thin rice noodles)
  • marinara sauce
  • nutritional yeast (optional)
Directions:  Cook pasta according to package directions.  Once the pasta is cooked, add marinara sauce and beans and top with nutritional yeast, if desired (for a cheesy taste).

You could also use a different variety of beans and more types or less types of beans. 


I needed a quick dinner and this couldn't have been more simple!

Tuesday, August 21, 2012

Chocolate Oatmeal

Chocolate first thing in the morning!? Yes, please!  This summer I discovered overnight oats (like this Mango Almond and this Strawberry Banana).  It is so easy to prepare the oatmeal (raw) the night before and enjoy the next morning cold (or hot, if preferred).  Great to just grab and go!  I have been eating my oatmeal cold since it has been so hot outside and I can enjoy hot oatmeal in the winter.

I recently saw this recipe for chocolate oatmeal, where you cook the oatmeal first, then place it in the fridge to absorb all the flavor and really add volume to the oats, and the next morning serve it hot or cold.  I decided to give it a try and even though the oatmeal was a different consistency (softer and less chewy) than the raw oats, it was still very tasty and adds another way to enjoy oatmeal!

I love the endless ways you can enjoy oatmeal.  Hot, cold, cooked, raw, and of course the variety of flavors just by adding in different fruits, extracts, powders, etc.

This recipe was adapted from Chocolate Covered Katie:

Ingredients:
  • 1/4 cup gf rolled oats
  • 3/4 cup almond milk
  • 1/8 tsp salt
  • 1/2 tbsp cocoa powder
  • 1/8 tsp pure vanilla extract
  • optional: handful of chocolate chips
Directions:
  1. Combine all ingredients in a microwave-safe bowl.  Heat for 2 minutes (watching carefully to make sure it does not spill over).
  2. Stir and heat for another 1-2 minutes (watching carefully).
  3. Stir and let it sit on the counter for about 5 minutes.
  4. Stir and place uncovered in the fridge overnight.
  5. The next morning stir in the optional handful of chocolate chips (if using) and eat cold or reheat and eat hot!

I loved how this took 10 minutes to prepare the night before and the next morning breakfast was already waiting for me to enjoy!

Monday, August 20, 2012

Lemony Rice and Tofu

It's Monday! Time for another Meatless Mondays from A to Z recipe.  It's the third week, so letter C is for Capers!
Better With Veggies
I have used capers in cooking before, but I wanted to try a new recipe.  Something that would be good for dinner.  I googled some ideas online and came across a recipe that called for capers, tofu, and asparagus.  Yum!  I made quite a few changes (like omitting the hot spices and peppers and adding brown rice and extra tofu) to make this more of a hearty main meal.
This recipe is adapted from Vegetarian Times:
Ingredients:
  • 1 package extra firm tofu
  • 1 tbsp olive oil
  • 1 small red onion, chopped
  • 4 cloves of garlic, minced
  • 2 1b. asparagus, cut into 1 1/2 inch pieces
  • juice from one lemon
  • 2 tbsp capers
  • salt and pepper to taste
  • brown rice
Directions:
  1. Cook brown rice according to directions on package. (I made a large batch so I would have leftovers.)  Alternatively, you can heat pre-cooked brown rice in the microwave.
  2. Prepare tofu by cutting into bite sized cubes and marinating for a few hours (I used the same ingredients as I did for this Baked Tempeh). 
  3. Preheat oven to 375F. Line a baking sheet with foil and spray with nonstick cooking spray.  Bake for 20 minutes, then flip the cubes as best as you can with a spatula.  Continue to bake for 10 more minutes.
  4. While the tofu is baking, heat olive oil in a skillet over medium heat.  Saute the onion for 3 to 4 minutes, or until soft.  Add the garlic and cook for 30 more seconds.
  5. Increase heat to medium-high.  Add asparagus, and cook for 3 to four minutes, or until the asparagus is bright green and crispy, stirring constantly.
  6. Add lemon juice, lemon zest, capers, salt, and pepper.
  7. Gently toss in tofu cubes and stir until everything is well mixed.
  8. Grab a bowl of brown rice, add some of the tofu mixture, and serve warm. 
For easier serving, combine your rice with the tofu mixture before serving.  Or if you want, you could omit the rice and just eat the tofu mixture.  Enjoy!

Before adding brown rice!

And after mixing with brown rice!

Sunday, August 19, 2012

Cherry Pancakes

I love making pancakes on Sunday mornings.  Yesterday, I mentioned how I have been also loving cherries!  Well since I had some leftover (ones that hadn't been eaten in my yogurt parfait, dipped in Nutella, or eaten washed out of the bag) I decided to make cherry pancakes!

As usual, I made a few changes from the original recipe.  I think the changes turned my pancakes from the pink color I was expecting (as shown in the original recipe) to a blueish color.  But they still tasted really good and it's always fun to have different colored food!

This recipe was adapted from here: (If you want to try to get those pink pancakes, try following the exact original recipe and let me know how they turn out!)

Ingredients:
  • 1 cup fresh cherries, pitted (measure before blending)
  • 1 cup gluten free bisquick
  • 1 tablespoon baking powder
  • 1/4 teaspoon xanthan gum
  • 1 tablespoon ground flaxseeds
  • 1/4 cup almond milk
Directions:
  1. In a blender, puree cherries until smooth.  (I recommend blending only about 3/4 cherries and roughly chopping the other 1/4 for more texture.  Or blend all cherries and just add additional chopped cherries.)
  2. In a mixing bowl, combine flour, baking powder, xanthan gum, and flaxseeds.
  3. Whisk in the cherry puree and almond milk and combine completely.
  4. Scoop batter by 1/4 cup onto an oiled skillet over medium low heat.  Cook both sides of each pancake until golden brown.

I made 10 pancakes with this recipe.


You can even top these pancakes with more chopped cherries!


I didn't think about taking this picture until I had already eaten 2 of the pancakes.  Plus, they smelled really good and I couldn't wait any longer to eat!


Saturday, August 18, 2012

Cherry Yogurt Parfait

I mentioned a few days ago that I was really enjoying yogurt parfaits in the morning for breakfast, but I have only put up one recipe so far, my Peach Yogurt Parfait.  I thought I would share today another yogurt parfait recipe with a different fruit I used, cherries!  I have been really enjoying cherries lately, so sweet and juicy!  I have been eating them plain, dipped in Nutella, and in this yogurt parfait!


I actually followed the exact same directions and used the exact same ingredients, except of course replacing the peaches with cherries, but here's the recipe:

Ingredients:
  • 1/2 cup yogurt (I used Silk vanilla soy yogurt)
  • handful of cherries, quartered and pitted 
  • granola (I used this homemade Light Granola)
  • 1/2 tablespoon chia seeds
Directions:
  1. Stir chia seeds into the yogurt and prepare cherries.
  2. Layer the parfait however you want. I added cherries, then yogurt, then granola, and repeated.
  3. If desired, sprinkle additional chia seeds on top!

Once again, this parfait can be for breakfast, a snack, or a dessert!

Friday, August 17, 2012

Strawberry Banana Sorbet

After being out in the sun on a hot day in the summer, sometimes you want a nice cool treat.  I went into my freezer saw a frozen banana and some frozen strawberries and knew I would be making Strawberry Banana Sorbet.


This sorbet works best if you have a high-speed blender because then you can just blend the frozen fruit and it will be a perfect consistency.  However, if you don't have a high-speed blender you may need to add almond milk, but then it may be more like a smoothie (which is fine too).  However, if you don't have a high-speed blender and would prefer sorbet over a smoothie and need to add almond milk, just add xanthan gum to thicken it up a bit.  (That's what I did and it was delicious!)

Ingredients:
  • 1 frozen banana, thawed
  • 5 frozen strawberries, thawed
  • a splash of almond milk (optional)
  • 1/8 tsp xanthan gum (optional for thickening)
Directions:
  1. Thaw the frozen fruit.  The strawberries will take longer to thaw.
  2. Blend the banana and strawberries until creamy.  You may need to add some almond milk to get everything moving.
  3. If you add almond milk, you may want to add xanthan gum to thicken up the sorbet.
  4. Scoop into a bowl (or glass for a smoothie) and enjoy!

You can even top this with additional strawberries or some chocolate sauce! 
Or try different variations like blending in different fruits (but keep the banana for creaminess), peanut butter, cocoa powder, etc.

Thursday, August 16, 2012

3 Bean Taco Salad

I love chickpeas and black beans.  They are my two favorite types of beans; however I love all beans, their tasty and a great source of protein and fiber.  I eat them a lot, usually mixed with veggies and/or rice.  Sometimes I add marinara sauce to make it more of like a "pasta" dish, sometimes I add salsa for a spicier mexican dish, sometimes I add tamari sauce for more of stir-fry dish, and sometimes I just sprinkle on some nutritional yeast.  Beans are so versatile :)

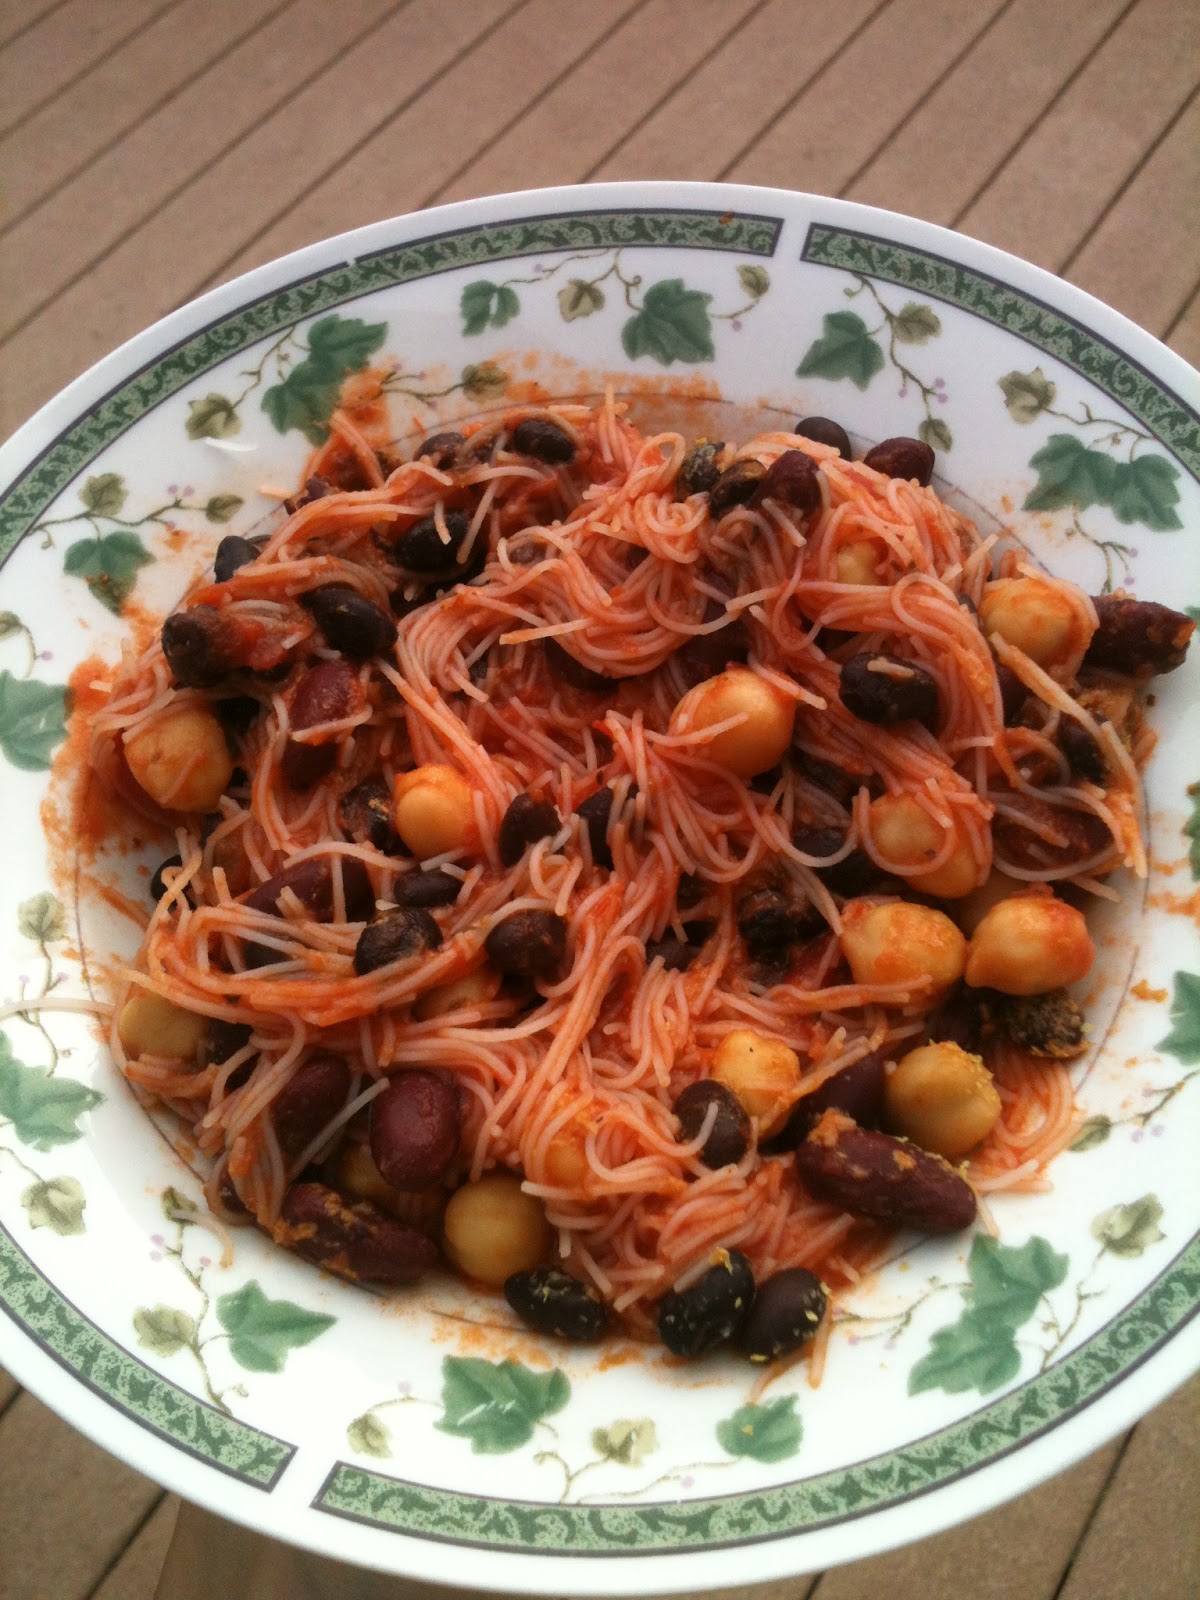
The other night for dinner I felt like I needed some protein.  Whenever I feel the need for protein I turn to my trusted beans.  As I made dinner, I kept adding ingredients to make this 3 beans taco salad.


I couldn't decide which type of beans I wanted though so I thought why not combine a little bit of three different kinds - chickpeas, black beans, and red kidney beans.  I decided to take the mexican route and add salsa.  I also had leftover daiya cheese from my Cauliflower Crust Pizza so I decided to sprinkle some of that in as well.  Then, I saw some lettuce in the fridge and had a great thought - why not make this into a taco salad, like a taco but without the taco and in a bowl like a salad.


Here's my recipe:

Ingredients:
  • a spoonful of chickpeas
  • a spoonful of black beans
  • a spoonful of red kidney beans
  • salsa (I used medium spicy)
  • daiya cheese (I used leftover mozzarella but cheddar would be delicious)
  • lettuce
Directions:
  1. In a bowl combine beans and daiya cheese.  Heat in microwave for 30 seconds to melt the cheese.
  2. Add salsa and lettuce and mix to combine.
Or just toss all ingredients together and eat cold.  This meal tastes great both ways!

Since I used a small portion of 3 different types of beans, I now have plenty of leftover beans to make other various meals with.  I stored the beans separately in case I wanted to use just one type of bean later in the week, but be on the lookout for another 3 bean meal in a few days ;)